Land Rover Defender Blog

How to Jack-up your Land Rover

This video will show you one method to safely jack-up your Land Rover, for wheel removal - and how to support the Landy on an axle stand.

Ben Gribbin

Ben Gribbin

April 16, 2015

Hello, I'm the editor of FunRover. I'm a massive Land Rover fan. Currently own a TD5 90. 2015 MR Blogger of the Year

Search

Popular Articles

8 Almost Useless Land Rover Mods

11th June 2014

Updated: What Makes a Defender Iconic?

29th November 2011

FUN ROVER STORAGE
1

Step 1: Place the vehicle on hard, level ground

For safety reasons, place the Land Rover on a hard, level surface before jacking.
2

Step 2: Apply the Handbrake or Parking brake

Apply the hand brake or parking brake.
3

Step 3: Select 1st Gear

This will prevent the vehicle from moving
4

Step 4: Select Low range & Engage difflock

This will also prevent the vehicle from moving
5

Step 5: Check the dashboard

Confirm the parking brake and difflock lights are illuminated, the Land Rover may need to be started and rolled forwards to trigger the difflock light
6

Step 6: Locate Jacking equipment

Remove the seat base, the battery compartment access panel and place carpet out of way. This is the location of the wheel nut wrench, wheel chock and jack (may be on bulkhead behind drivers seat in a hard-top / 90)
7

Step 7: Locate Locking Wheel nut key

You’ll also find the bottle jack lever and extension piece under the rear seats (or again, on the bulkhead) and you'll need the locking wheel nut key if you have alloy wheels fitted.
8

Step 8: Chock the wheels

Chock the wheels that will not be raised into the air, further reducing the chance that the Land Rover can roll or fall off the jack.
9

Step 9: Place jack under axle

Raise the jack just enough to take some of the weight off of the wheel.
10

Step 10: Loosen wheel nuts

Wheel nuts can become seized and very tight. You may have to place the wrench on the nut and stand (even jump) on the wrench to release the nut. Only loosen the nut, do not fully remove it. This technique prevents excessive force rocking the Land Rover, which carries the risk of the vehicle slipping off the jack or stand. It also applies no rotational force to the transmission. Use your locking wheel nut key to remove the locking wheel nut.
11

Step 11: Lift wheel off ground completely

Allow room for lifting the wheel off
12

Step 12: Remove all but one nut completely

Using the wrench, remove all but one nut. This stops the wheel falling off prematurely. When you are ready, place your hand at the top of the wheel, and undo the last nut. Then, being careful so as not to injure yourself, lift the wheel off of the hub. You can place the wheel under the vehicle as a precaution should the jack fail or the vehicle fall off the stands.
13

Step 13: Position the Axle stand

Raise the axle stand to an approved jacking point (found in the owners manual), before lowering the bottle jack and the Landys weight onto the stand. Repeat until all 4 wheels are removed and the vehicle is supported on 4 stands (or as needed).
ICON

Old style Pillar Jack

If you have one of the older Land Rover jacks, you'll need to remove the jack from it's bag and assemble. Then, place the jacking tube into the crossmember or dumb iron jacking hole, ensuring the jack is vertical and perpendicular to the ground. Then, using the ratchet, lift the vehicle. These jacks are much slower than a bottle or trolley jack, as each turn only lifts the vehicle a few millimetres. Also, the jack first has to take up the movement of the suspension and so only the last few turns actually lift the wheels from the ground.

Refitting the wheels

1

Step 1: Refitting Wheel

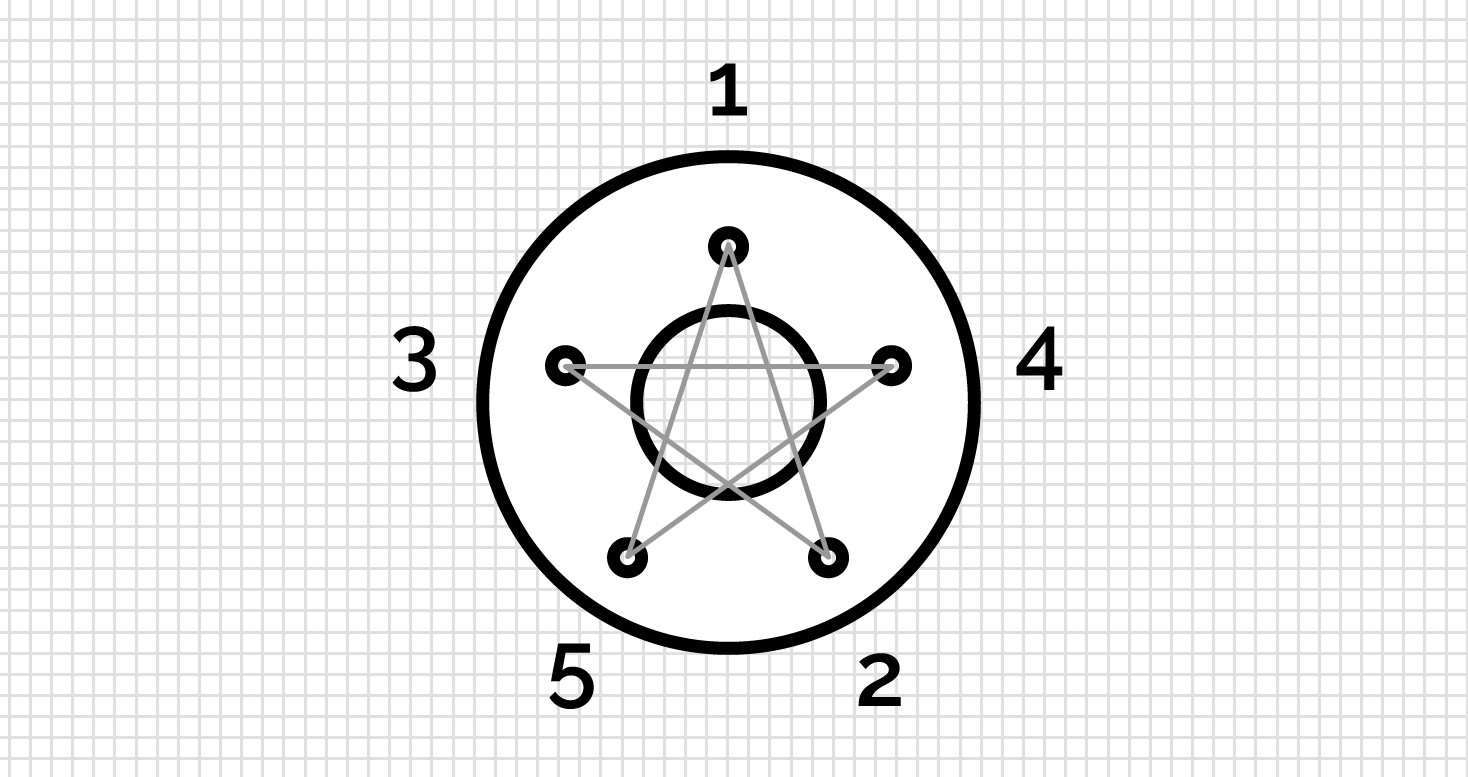
lugnut
Lift the wheel squarely onto the hub, aligning the 5 studs. Tighten gradually working in a star pattern (moving to the opposite nut). This will evenly align the wheel, never work in a circular pattern!
2

Step 2: Torque and Re-torque

Torque the nuts to the correct torque specification as set out in the manual. The torque setting is different for alloy, steel and heavy duty wheels. After 50 miles, re-check the torque.

Related items for sale on eBay

Ebay has returned a malformed xml response. This could be due to testing or a bug in the RSS2 Generator. Please check the support forums to see if there are any posts regarding recent RSS2 Generator bugs.
CURL error code = 6. (Could not resolve host: rest.ebay.com)

Leave a Reply

About Us

FunRover is a place for Land Rover enthusiasts to gather as a community and discuss the best 4x4 vehicles ever produced. We're building a library of high quality resources & articles to help owners along in their Land Rover ownership.

Get in Touch

Want to get in touch?

e: hello@funrover.com